If you’ve ever picked up a Portland Rib Plotter, you’ll know it looks a bit like a standard course plotter but with a twist. It’s not really designed for long passages offshore. Instead, it comes into its own when you’re working close to the coast or with maps on land.
The idea is simple: rather than measuring bearings against true north, the portland rib plotter measures directions against the coastline itself.
For sailors and students alike, it’s a useful bit of kit – especially on charts around the 1:500,000 scale, which is what it’s calibrated for.

What makes it different?
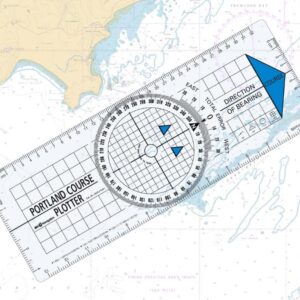
Think of the rib plotter as a halfway house between a protractor and a course plotter. In the middle you’ve got a simple compass rose. From that centre point run straight “ribs,” which give the tool its name. The whole thing is designed so you can drop it onto a map, line it up with the coast, and instantly get a bearing that makes sense in relation to the shoreline.
It’s light, easy to carry, and takes about two minutes to get the hang of.
Using a Rib Plotter in practice
Here’s the way most people use it:
- Put your map or chart flat on the table.
- Choose your starting point, let’s say a harbour entrance or a headland.
- Place the centre of the plotter over that spot.
- Rotate the plotter until one of the straight edges sits neatly against the coastline.
- Now look across to your second point of interest. The degree scale on the compass rose will give you the direction relative to the shore.
That’s really all there is to it. Once you’ve done it a couple of times it becomes second nature.
Rib Plotter vs Course Plotter
A fair question is: why not just use a normal Portland Course Plotter? The answer is down to reference points.
- The course plotter works with true or magnetic north. It’s the right tool when you’re planning open-water legs.
- The rib plotter takes the coast as its reference instead. That makes it quicker and more intuitive if you’re working inshore or on land maps, where aligning everything to north isn’t always the most useful approach.
Plenty of skippers carry both, using the rib plotter for short coastal hops and the course plotter when they head further offshore.
A few handy tips
- Stick to maps and charts around 1:500,000 scale. That’s where the rib plotter matches up properly.
- When you first try it, practice with a bit of coastline you know well. It’s easier to see how the tool works when you can picture the ground truth.
- Keep it flat. Accuracy suffers if you’re using it on your knee while the boat’s bouncing around!
The Rib Plotter isn’t as well-known as the course plotter, but it definitely has its place. It’s simple, quick, and makes sense the moment you start using it. For sailing schools, clubs, or anyone who wants an easy way of plotting bearings against the shore, it’s a cheap and cheerful tool that earns its keep.
NOTE: Our guides are intended as just that, a guide. Please seek professional instruction before attempting to use these tools yourself.